Snow White and the 2 Stop Overexposure
This past weekend we had our first big snow fall, got some more last night and they're predicting more for this week. So, it only seems appropriate that I post something here about shooting snow. Snow is very bright and many of us have a hard time capturing that quality in our snow images. They usually come out gray and muddy. So, for my benefit, I'll talk through the problem and consequently give you something to chew on the next time you're shooting snow.
Here's the deal ... the problem is your camera's exposure meter. Especially, if you're using 3D Matrix metering, or even center-weighted metering. The meter looks at the scene and calculates an "average" value to use to expose the image. In other words, the meter looks at the really dark areas, the really bright areas and all the values in between and comes up with an average that we trust will expose the image properly. Unfortunately, the image doesn't workout that way.
Just for the record the "average" that I'm talking about is technically known as 18% gray. Essentially, black is black (0%) and white is white (36%) meaning that photographic black reflects 0% of the light shining on it and photographic white reflects 36% of the light shining on it. The camera's meter takes all that into account and returns an exposure value base on the 18% benchmark ... or average.
This works great for a scene with 50% dark values and 50% light values. The problem arises when you shoot a snowy scene because usually much more than 50% of the scene is reflecting 36% light or photographic white. So, consequently the exposure meter suggests a value that is one or two stops too low or underexposed turning that beautiful white snow to a muddy gray. Bummer.
There are a few different approaches you can take to counteract the camera's proclivities to underexpose snow and luckily they're all pretty simple.
First off ... using 18% gray as our benchmark if I underexpose an image by four stops I can achieve photographic black. On the other hand if I overexpose by two stops I can achieve photographic white. Give it a try. After all, you're shooting digital now and you won't be wasting any resources. See what you come up with.
So, for the first trick ... you can assume that you need to overexpose by 2 stops to achieve photographic white. Working in manual exposure mode it's easy enough to crank your exposure open 2 stops on every shot. If you're using one of the auto modes (Aperture, Shutter, Program) you can set an exposure compensation value of +2. Using the program modes you may have a setting for shooting in snow (sometimes indicated with a snowman\sun icon) or you can select one of the other program modes and leave your exposure compensation value at +2. This is the best solution when shooting with a modern, compact point and shoot camera ... set your exposure compensation to at least +1 but no more than +2.
The trick that I like is set the D70/70s to manual mode. Set the aperture you want for your subject ... perhaps f/8 and then point your D70/70s to the sky. While looking at the sky, set the shutter speed so the exposure is correct ... not underexposed and not overexposed. Then, shoot away at the subject. Once you point your camera back at the subject you'll notice in the viewfinder that the exposure meter is overexposing the scene somewhere between 2/3 stops and 2 stops. The nice thing is the exposure seems to be more accommodating to the overall scene. Metering off the sky tends to give you a more precise exposure based on the light that's reaching the subject versus the light that is reflecting off the subject.
If you have the time to take you can use a gray card and set your meter to the light that is reflecting off the gray card subject. Test the difference between using a gray card and using the sky. They're real close! And since a gray card isn't always at hand using the sky is a great convenience!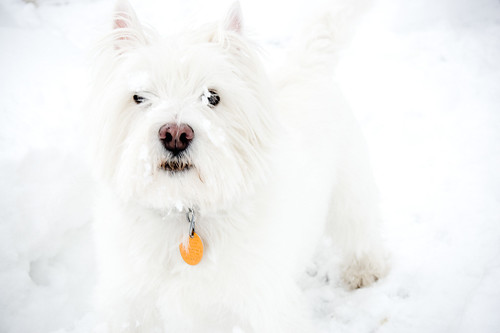
This one of Bailey I purposefully overexposed by more than 2 stops so that she just faded into the white surroundings. At least that demonstrates the control you have and it's fun playing around with principles of physics ... isn't it?
Hope this helps! Thanks for reading.
i shoot nikon


2 comments:
Deke, great explanation. I have ben shooting with a Nikon D200S for about the past year. I may be moving up to the D300 soon as I have a friend interested in my D200.
God knows we have had plenty of snow here this winter—and ice. I took some pretty interesting shots of the aftermath of an ice storm that we had earlier in the winter. 3/8 of an inch of ice on everything—specular highlights everywhere!
Thanks Bill! I found the "pointing at the sky" trick really works. It's actually from Bryan Peterson's book Understanding Exposure which is worth every penny. It has a lot of practical applications in it that are real easy to implement when you're out shooting.
Good luck with the D300. I've been lusting over one myself.
Post a Comment