7.13.2007

Whatever happened to Bobby Sherman?

I was in Seattle earlier this week attending a web design conference with about 400 other geeks from all over the place. Web Design World was held at the Marriot on the waterfront.

I had never been to Seattle. I had never been to a web design conference. Both were extraordinary. The only thing awry was the weather. It didn't rain! Not one drop. In fact, I had checked the weather forecast prior to my arrival. It was to be sunny and in the 70's while back home it was going to be sunny, hot and in the 90's. What actually happened ... sunny and 70's back home, sunny and hot in Seattle!

My day's were pretty much filled with conference but, I woke up early and took some shots, shot a sunset from the pier of the Seattle Aquarium on Monday night and took a couple of hours from the conference on Tuesday afternoon.
seattle-23
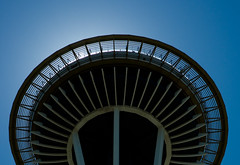
I just took my camera with my trusty 18-70mm f/3-4.5. This was a great lens to walk with. It's fast, sharp (I tried to keep the aperture around f/8.0) and light weight. I walked up toward the Space Needle ... did you know that thing was built in 1962. It's amazing that it's been around that long.

I got some great shots along the way and around the Space Needle. The one on the left was taken when the sun was really high in the ski. You can see it casting an eclipse effect, halo around the capsule.

Just under the Space Needle nested in the landscape I met Earl. Well, I call him Earl because I forgot to ask him his name.
seattle-24
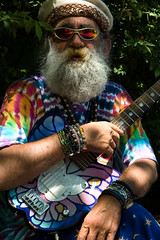
Anyway, I had snapped a quick shot of Earl and thanked him by throwing a buck into the colander he was using to hold his street money. We got to chatting and he asked where I was from and what I was doing in Seattle. I told him I was here for a web design conference expecting the conversation to be over quickly. Not so, oh Stop Bath breath!

Earl proceeded to inform me that he was a Photoshop expert, had been working with Photoshop since its inception and launched into a lesson about the Photoshop interface instructing me on the exciting use of layers and the different blending modes. He was great.
seattle-28
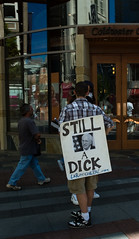
I wandered down 5th Avenue to the retail district catching this shot of a kid passing out flyers in support of the LaRouche Political Action Committee whatever that is. It was just a good photo opp.

It was about here where I turned back toward the waterfront and ended up at the Public Market Center ... that famous farmers market ... where they throw the fish back and forth. A couple of times I thought I saw Bobby Sherman. I needed a Starbucks.
seattle-29
One of the things I worked on today was purposely stay away from 3D Matrix metering and use center-weighted. I found that, in the light of midday sun, I was able to get the exposure I wanted more accurately. I kept the camera in Aperture Priority (A) mode and ISO 200 for the whole walk although I raised the ISO to 400 and popped the on-board flash when I got inside the market.

More images Seattle set on Flickr.

i shoot nikon

7.09.2007

1.2 Distance - Again ...

I promised ... or at least alluded that I would redo my attempt at the second lesson concerning distance in my last post. This has been a good exercise and revealed a lot answers that have been plaguing my previous, aimless attempts at lighting.

Working with a single light is particularly eye-opening in that there is so much to realize about the possibilities. Distance, angle, intensity, texture, shape, definition ... all of which are critical to the decisions you make about your subject and photographing it or them. It points the possibilities as you add more light, reflect light, intensify light, etc.

In this, my second attempt I stuck strictly to the formula described in the assignment and worked with only two changing variables: distance and aperture. Here's the result:View Larger

So ... all I did was move the light closer to the subject and as the intensity of the light increased I stopped down the aperture to compensate for the extra light reflecting back from the subject. In that way the apparent light being reflected from the background decreased finally turning the background to a rich black.

Now I can determine how much of the background is needed for the image and know how to control that effect. That's very cool. I'm assuming that as more lights are added that making these decisions, although more complex will be easier to layer into place.

i shoot nikon

7.02.2007

Lighting102 - Lesson 1.2 Distance

Hmmm ... light has DOF (depth of field) ... sort of. I had to think about this one and mess around with the assignment set up before I started to get it.

So the objective of this exercise was to demonstrate that light has DOF and with enough light, you can turn any white wall background black. After playing with this exercise I think another way of looking at it is to consider that we are controlling the pace at which light "falls off" beyond our subject. And using that as a design choice or tool set to control our compositions.

Setting Summary


Camera: Mode @ Manual, Shutter @ 1/125th, Aperture @ f/5.6.
SB-800: Mode @ Remote, Channel 3, Group A, Zoom @ 50mm
SU-800: Mode @ Remote (not Macro), Group A set to 1/8 power on Channel 3

What I kept constant throughout the exercise was the shutter speed and the angle for the light to the subject. Otherwise distance from subject, flash output power changed. Aperture changed on the last image because I ran out of lower output settings on the flash. I tried to match the previous exposure by reducing the flash output only as I moved the flash closer to the subject.

Result

assign2comp
D = distance, FP = flash power, A = aperture, S = shutter

Theoretically, it makes sense to me that what we're simulating is moving the background farther away from the subject. The distance between the subject and the light source remains the same throughout. The light power level and exposure settings remain the same. Only the distance between the background and the subject change.

However, since it can be infinitely more difficult to move the background (unless of course, you're Flo Zigfield or the like) we simulate the same principle: decrease the amount of light therefore darkening the background; decrease the distance from the light to the subject which increases the intensity of light on the subject but, produces more rapid falloff past the subject.

I think I'll do this exercise again only leave the power level of the light source the same and adjust only the aperture to accommodate the increased intensity on the subject as the light becomes closer. I'll let you know how it turns out.

i shoot nikon

7.01.2007

Lighting102 - Lesson 1.1 Position

Well ... I finally got some time to get started on Strobist Lighting Bootcamp - Lighting 102. The first assignment was to take a series of photographs with a single off-camera strobe, keep it the same distance from the subject but, change its angle to the subject.

I kept my study pretty simple. The flash was positioned over the top of the camera at a direct angle to the subject, moved 45 degrees to the right and again to 90 degrees or full side.

As for the equipment - I used my D70s with an 18-70mm zoom. I mounted a Nikon SU-800 on the camera. This is a great piece of equipment that acts as a remote commander for up to three groups of flashes on three different channels.

I put my SB-800 Speedlight on a lightstand and raised the stand so that the flash head was at about the same level as the camera lens. The light was kept about 4 - 5 feet from the subject and the subject was about 5 feet from the background.

Setting Summary


Camera: Mode @ Manual, Shutter @ 1/60th, Aperture @ f/5.6 (that was about 2 stops shy of a correct ambient light exposure of which there wasn't much).
SB-800: Mode @ Remote, Channel 3, Group A, Zoom @ 70mm
SU-800: Mode @ Remote (not Macro), Group A set to 1/64 power on Channel 3

The Results


assign1comp

I put together this composite shot to closely compare the changing light positions. I'm glad that I kept the flash head at the same height as the camera lens because the result is quite dramatic.

What struck me about the differences in the light position is look closely at the left side of my face. All of a sudden there is detail given to even the smallest variation in texture. The definition given to the shape of the face is quite dramatic as well. There's character that didn't exist in the shot with front light!

Looking at the 90 degree shot shows even more defined qualities. And drama! Movie poster stuff! Now, I'm not too sure I'd use this exact technique for a senior portrait but, being able of adding just a little drama to an otherwise dull teenage condition might prove useful and profitable.

i shoot nikon